Easy Money Origami: 30+ Dollar Bill Folding Tutorials
Money Origami is a fantastic way to transform a simple dollar bill into something truly special! Imagine a delicate lotus flower unfolding, a dapper little shirt ready for a tiny desk, or even a playful ring – all crafted from your own greenbacks. This tutorial is perfect for complete beginners and kids, offering a fun and engaging activity that takes just a few minutes per fold. Whether you’re looking for a unique way to give a gift, add a touch of whimsy to your space, or just want to try a new craft, you’ve come to the right place.
In this guide, I’ll walk you through over 30 easy dollar bill folding tutorials. We’ll start with the absolute basics and move on to more intricate designs, teaching you fundamental folds and techniques you can use again and again. Get ready to unleash your creativity and surprise yourself with what you can make!
Money Origami: 30+ Easy Dollar Bill Folding Tutorials
Welcome to the wonderfully whimsical world of money origami! It’s a fantastic way to add a personal touch to gifts, create unique decorations, or simply transform a humble dollar bill into something truly special. In this comprehensive guide, we’ll explore how to get started with money origami, focusing on creating over 30 easy and delightful models. We’ll cover everything from choosing the right “paper” to mastering essential folds, troubleshooting common mistakes, and making your creations shine.
Choosing Your “Paper”: The Dollar Bill and Beyond
When we talk about money origami, the most common material, of course, is a dollar bill. But what makes a dollar bill good for folding, and what other options do you have?
The Dollar Bill Itself
The standard US dollar bill is a great starting point. It’s a specific size (approximately 6.14 inches by 2.61 inches) and has a weight that’s surprisingly good for folding. It’s made of a cotton and linen blend, which gives it a nice crispness and durability. This means it can withstand repeated folds without tearing too easily.
* **Type:** US Dollar Bills (or any currency of similar size and material).
* **Weight:** The standard bill weight is ideal. It’s not too thick, which would make precise folds difficult, nor too thin, which would make it flimsy.
* **Size:** The standard size of a US dollar bill is what most money origami models are designed for.
* **Single or Double-Sided:** Most money origami models are designed to be folded with the bill facing a particular side up. Often, the side with more intricate details (like portraits or buildings) is used as the “front” of the finished model. You’ll want to pay attention to which side the instructions indicate you should start with. For most simple models, it doesn’t make a huge difference, but for more complex ones, it can affect the final aesthetic.
Beyond the Dollar Bill
While dollar bills are traditional, you’re not limited to them!
* **Other Currencies:** Many currencies from around the world are a similar size and paper composition and work beautifully for money origami.
* **Play Money:** This is a fantastic alternative for practicing without using real currency. It’s often a bit thinner and more flexible, which can be easier to fold for beginners.
* **Decorative Paper:** If you want to create something purely decorative, you can use paper cut to the size of a dollar bill. Origami paper, cardstock (though this can be too thick for many models), or even patterned scrapbook paper can work. For patterned paper, consider how the pattern will look on different sides of the finished model. If a model requires two distinct sides to show, using a double-sided patterned paper where both sides have different colors or designs can be very effective.
Mastering the Base Folds: Your Origami Foundation
Before we dive into specific models, let’s get comfortable with a few fundamental folds. Precision is key in origami, and these basic folds will be the building blocks for almost every money origami creation.
The Valley Fold
This is the most basic fold. Imagine you’re creating a “valley” in the paper.
1. Take your dollar bill and place it flat in front of you.
2. Choose an edge to fold towards. For example, take the top edge and bring it down to meet the bottom edge.
3. As you bring the edges together, crease the fold firmly. You can use your fingernail or a bone folder (a smooth, flat tool) for a crisp crease.
4. Unfold the paper. You should see a line running across the paper.
The Mountain Fold
This is the opposite of a valley fold. Imagine you’re creating a “mountain” ridge.
1. Perform a valley fold along a line.
2. Then, reverse the direction of the crease so that the fold pops *upwards* when viewed from the original side.
3. To make a mountain fold directly, you’d typically bring an edge *away* from you, creating a fold that stands up. For example, if you want to mountain fold a flap you’ve just valley folded, you would simply reverse the direction of that crease.
The Squash Fold
This is a slightly more advanced, but very common, fold. It involves opening up a section of paper and pressing it flat.
1. Make a valley fold that creates a point or an edge. For instance, if you have a flap folded down, and you want to squash it.
2. Gently open up the paper along the crease you just made.
3. Press the paper flat, guiding the sides of the flap to meet the crease. The goal is to flatten a triangular or rectangular section into a new shape.
Making Clean Folds
* **Align Precisely:** Always take your time to align edges and corners as perfectly as possible before making a crease. Even a millimeter off can affect later steps.
* **Firm Creases:** Use your fingernail, a ruler, or a bone folder to run along the fold line firmly. This makes the fold sharp and helps it stay in place.
* **Work on a Flat Surface:** A hard, flat table is your best friend for clean folds.
* **Unfold and Refold:** If a crease isn’t clean, don’t be afraid to unfold and try again.
A Walkthrough: The Classic Money Origami Heart
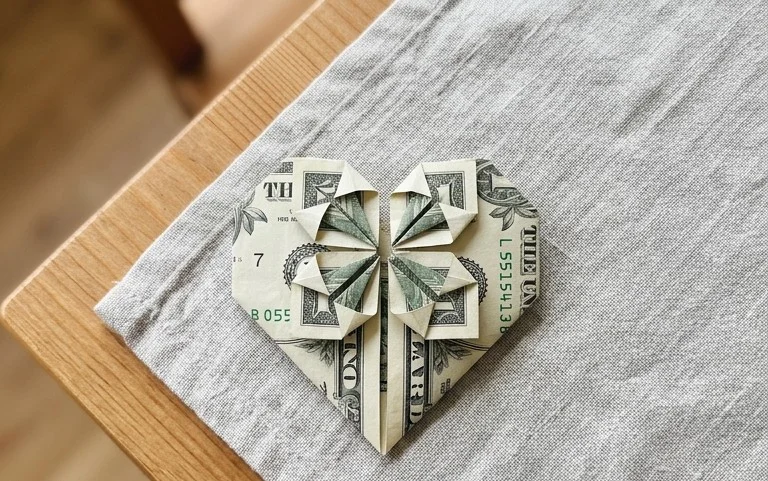
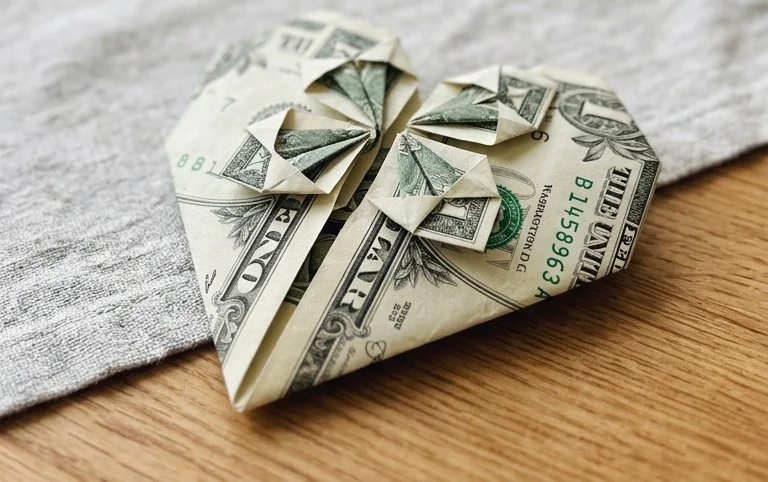
Let’s start with a timeless classic – the money origami heart. This is a great beginner project that yields a lovely result.
Step-by-Step Folding Sequence
We’ll assume you’re using a US dollar bill.
1. **Preparation:** Place your dollar bill horizontally in front of you. The side you want to be the “front” of your heart should be facing *upwards*. Most people use the side with the portrait of George Washington as the front.
2. **First Fold:** Bring the top edge of the bill down to meet the bottom edge. Crease firmly from left to right. You’ve now created a horizontal crease in the middle of the bill. Unfold the bill.
3. **Second Fold:** Bring the bottom edge of the bill up to meet the horizontal crease you just made. Crease firmly.
4. **Third Fold:** Now, bring the top edge of the bill down to meet the same horizontal crease. Crease firmly. You should now have a bill that is about half its original height, with two creased edges meeting in the center.
5. **Flip Over:** Turn the entire bill over so the side that was previously facing down is now facing up.
6. **Corner Folds (Left Side):** Take the top-left corner of the bill and fold it diagonally downwards so that the left edge of the bill aligns perfectly with the horizontal center crease. Crease firmly.
7. **Corner Folds (Right Side):** Repeat the same diagonal fold with the top-right corner. Fold it diagonally downwards so the right edge of the bill aligns perfectly with the horizontal center crease. Crease firmly. You should now have two triangular flaps pointing downwards.
8. **Flip Over Again:** Turn the entire bill over once more.
9. **First Point Fold:** Look at the top of the bill. You’ll see the two points you just created by folding the corners. Take the very tip of the top-left point and fold it *downwards* just a small amount – about half an inch or so. This softens the sharp point and starts to shape the top curve of the heart. Crease firmly.
10. **Second Point Fold:** Repeat the same small downward fold with the tip of the top-right point. Crease firmly.
11. **Side Flap Folds:** Now, look at the two triangular flaps on the left and right sides of your model. Take the left triangular flap and fold its outer edge inwards so it aligns with the vertical edge of the bill underneath it. Crease firmly.
12. **Repeat Side Flap Fold:** Do the same with the right triangular flap. Fold its outer edge inwards so it aligns with the vertical edge of the bill underneath it. Crease firmly.
13. **Final Shaping:** Gently pinch the sides of the heart to give it a slightly more three-dimensional shape. You can also slightly curve the top “lobes” of the heart with your fingers.
Congratulations, you’ve made a money origami heart!
Common Pitfalls and How to Avoid Them
It’s completely normal to make a few mistakes when you’re starting out. Here are some of the most common places beginners go wrong and how to steer clear of them:
1. Messy, Sloppy Creases
* **The Problem:** Folds that aren’t sharp and precise make the entire model look messy. This can also make subsequent folds harder because the paper doesn’t lie flat.
* **How to Avoid It:** As mentioned before, *always* use a firm crease. Run your fingernail or a tool along the fold line multiple times. Take your time to align edges and corners *before* you commit to the crease. Imagine you’re trying to make the paper remember that fold line perfectly.
2. Misaligned Edges and Corners
* **The Problem:** If you don’t line up edges and corners perfectly in the early stages, the inaccuracies will compound as you fold. This can lead to misshapen models or sections that just don’t fit together.
* **How to Avoid It:** This is crucial, especially in the first few steps of any money origami model. When an instruction says “bring the top edge to meet the bottom edge,” *physically touch* those edges together. Ensure there are no gaps or overlaps before creasing. For corner-to-corner folds, make sure the corners meet precisely. It’s better to undo a fold and redo it for perfect alignment than to push through with a misalignment.
3. Not Understanding “Which Way Up” or “Which Side”
* **The Problem:** Some models require specific sides of the bill to be facing up at certain stages, or a certain side of the paper to be used for a fold. Not paying attention to this can result in a model where important details are hidden or the desired aesthetic isn’t achieved.
* **How to Avoid It:** Read the instructions carefully before you start each step. The instructions will often specify whether to flip the paper or which side should be facing you. If a step involves folding a specific color or pattern, make sure you’re using the correct side of the bill. For practice, it’s useful to mark one side of a practice bill with a small dot so you can easily distinguish it.
Varying Your Money Origami Creations
Once you’ve mastered a few basic models, don’t be afraid to get creative!
* **Size:** While dollar bills are standard, you can experiment with other denominations. Larger bills (like $100s) will create larger models, while smaller bills (like $1s or $5s) might be easier for intricate folds or for smaller hands. Different currencies will also have slight size variations.
* **Paper Pattern and Color:** This is where you can really make your creations pop!
* **Patterned Bills:** If you’re using play money or decorative paper cut to size, choose patterns that complement the model. For a ring, a floral pattern might be lovely. For a star, a geometric pattern could look striking.
* **Color Combinations:** If a model requires multiple pieces of “paper,” try using different colors for each piece. For example, a money origami flower could have colored petals and a different colored center.
* **Reversed Sides:** For models that show both sides of the bill, consider how the different colors and designs interact. Some bills have distinct portrait sides and building sides.
* **Combining Models:** You can create a bouquet of money origami flowers, string together money origami hearts, or arrange money origami animals into a scene.
Displaying and Gifting Your Masterpieces
Finished money origami models are not just fun to make; they’re also wonderful to share and display.
* **Gifting:**
* **Enclosed in a Card:** A money origami heart or flower tucked into a birthday or thank-you card is a delightful surprise.
* **In a Gift Basket:** Arrange several money origami creations at the bottom of a gift basket for a unique and eye-catching presentation.
* **Part of a Larger Gift:** Place a money origami star on top of a wrapped present, or use a money origami ring to hold a small token gift.
* **Tucked into Wallets or Purses:** A surprise money origami shape can bring a smile to someone’s face unexpectedly.
* **Display:**
* **Shadow Boxes:** Mount your money origami creations in a shadow box for a sophisticated display.
* **Holiday Decorations:** Fold festive shapes like money origami Christmas trees or stars for your holiday decor.
* **Table Centerpieces:** Arrange several money origami models together for a unique and conversation-starting centerpiece for parties or dinners.
* **Desk Accessories:** A small, well-made money origami animal or object can be a charming desk decoration.
Money origami is an accessible and rewarding craft. With a little practice and patience, you’ll be folding beautiful creations in no time, ready to impress friends, family, or simply to enjoy yourself. Happy folding!
Conclusion
Congratulations on exploring the wonderful world of money origami! You’ve learned how to transform simple dollar bills into beautiful creations. Don’t be discouraged if your first attempt isn’t perfect; every fold is practice, and you’ll quickly improve. We encourage you to dive in and try these easy dollar bill folding tutorials. Once you’ve mastered a few, share your amazing money origami creations with friends and family!
Ready for your next challenge? Try folding a dollar bill into a heart or perhaps a playful ring. There are so many exciting possibilities waiting for you. Keep folding, and don’t forget to explore more delightful paper projects we have in store!